Category Archives: Software

Java Tuples

One oft-noted feature of the Java language is it’s lack of a tuple data type. This leads to an abundance of classes that provide the convenience of grouping more than one value into a single object. These classes usually look more or less like this:

public class ObjectPair<A, B> {
    private A primary;
    private B secondary;

    public ObjectPair(A primary, B secondary) {
        this.primary = primary;
        this.secondary = secondary;
    }

    public A getPrimary() {
        return primary;
    }

    public B getSecondary() {
        return secondary;
    }

    @Override
    public String toString() {
        return "(" + primary.toString() + ", " + secondary.toString() + ")";
    }
}

Sometimes you’ll see more specific classes like ObjectWithString, but the idea is the same. This approach is fine for many common tasks, but if you find yourself needing multiple cardinalities of tuple, this approach get’s tedious quickly, as you find yourself writing ObjectTriple, ObjectFourTuple, ObjectFiveTuple, and so on. Thinking that it would be smart to have one class that could create a tuple of any length, you might end up being tempted to write a class like this:

public class Tuple<A>  {
    public static Tuple<A> getTuple(A... args) {
        return Tuple(args);
    }

    private A[] items;

    private Tuple(A[] items) {
        this.items = items;
    }

    public A getItem(int index) {
        return items[index];
    }
}

But this is even worse than what we had before! Not only are we limited to one type of object (which adds the major headache of unsafe casting to a common use of tuples) but we no longer have any idea of how many items our tuple holds. This approach seems to be a real step backwards, as it’s really just a wrapper around an array, which gets rid of any advantage of having a tuple type available.

To make the single-class approach work, we’ll need some way of storing more information in the type of our tuple objects, by taking an idea from functional programming. We define a type that contains information about how long our tuple is, and what type exists at each location. This recursive type is simply defined, but allows us to create tuples of any length:

public abstract class Tuple<T, U extends Tuple> {
    public abstract T getItem();
    public abstract U getTuple();

    public static final <T> Tuple<T, EmptyTuple> getTuple(T item) {
        return new SingleItem(item);
    }

    public static <T, U extends Tuple> Tuple<T, U> getTuple(T item, U tuple) {
        return new SingleItemAndTuple<T, U>(item, tuple);
    }

    public static abstract class EmptyTuple extends Tuple {}

    private static class SingleItem extends Tuple<T, EmptyTuple> {
        private T item;

        public SingleItem(T item) {
            this.item = item;
        }

        public T getItem() {
            return item;
        }

        public EmptyTuple getTuple() {
            return null;
        }
    }

    private static class SingleItemAndTuple<T, U extends Tuple> extends Tuple<T, U> {
        public T item;
        public U tuple;

        public SingleItemAndTuple(T item, U tuple) {
            this.item = item;
            this.tuple = tuple;
        }

        public T getItem() {
            return item;
        }

        public U getTuple() {
            return tuple;
        }
    }
}

Now we have all of the tuple type-safety we could want, at the expense of clumsy notation:

class TupleTest {
    public static void main(String[] args) {
        Tuple<String, Tuple<Integer, Tuple.EmptyTuple>> tuple = Tuple.getTuple("Test", Tuple.getTuple(Integer.valueOf(1)));
        System.out.println(tuple.getItem());
        System.out.println(tuple.getTuple().getItem());
    }
}

Re-enable virtual terminals on Ubuntu 12.04

In the past month I’ve been getting accustomed to Ubuntu 12.04, and all of the changes it brings to the user interface of Ubuntu. One issue I’ve been especially bothered by is the lack of virtual terminals, at least of users of NVIDIA’s proprietary drivers (myself included). The issue seems to stem from the fact that Ubuntu 12.04 makes use of a hardware framebuffer to draw a splash screen on boot, which causes issues with the driver when attempting to switch virtual terminals. I had a hard time finding any solutions to my problem, until I found this post on AskUbuntu which gives a couple suggestions. While the poster suggests going all out and completely disabling graphical boot, he also suggests a less drastic solution, adding a flag to the linux boot options that prevent loading framebuffer modes that interfere with virtual terminals.

To do this, open /etc/default/grub in a text editor and find the line that reads

GRUB_CMDLINE_LINUX_DEFAULT="quiet splash"

and change it to read

GRUB_CMDLINE_LINUX_DEFAULT="quiet splash vga=normal"

Rebooting your computer should leave the grub menu and boot splashscreen unchanged, while the virtual terminals work perfectly! Of course, your mileage may vary, depending on your system. This works for me on a fully updated install of Ubuntu 12.04, with an NVIDIA 9800 GT.

More Map Scripts

In the last installment”Ž I wrote a script (gdal_slice.py) to cut up geotagged images and save them in a format that GPSdrive will read. I’ve uploaded that script into a new repository on GitHub.

I’ve also uploaded a script I wrote called get_quad.py, which will download USGS topographic maps automatically. This script naturally complements gdal_slice.py; using the two together allows for almost-totally automatic population of GPSdrive’s map database with high quality topographic maps.

usage: get_quad.py [-h] [-q] [-s STATE] (-g | -c COORD COORD)
Get DRG USGS quad for given latitude and longitude from LibreMaps.org
optional arguments:
 -h, --help show this help message and exit
 -q, --silent don't produce any output
 -s STATE, --state STATE
 Postal abbr. for the state in which the quad falls, so
 we don't need to look it up
 -g, --gps get coordinates from GPSd
 -c COORD COORD, --coords COORD COORD
 specify latitude N and longitude E (respectively) in
 decimal degrees; longitude should be negative, as all
 maps fall in the western hemisphere

Unfortunately, because of the way USGS maps are organized, the script needs to know the state in which the coordinates fall. If the -s flag is not given, this is inferred from the coordinates, but this lookup requires internet access.

Bluetooth Android GPS on OS X

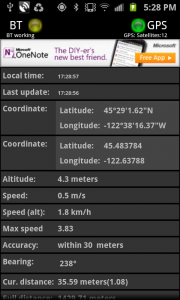
Inspired by this link from the GPSd homepage I set out to use my brand new Android phone as a bluetooth gps. Naturally, I wanted to use it with GPSd, but on OS X. I read through the Linux directions and thought “this shouldn’t be terribly hard on a Mac!” As it turns out, I was right!

The first step was downloading an app to the phone. I used the free GPS over BT, but the steps should work with most other programs like it.

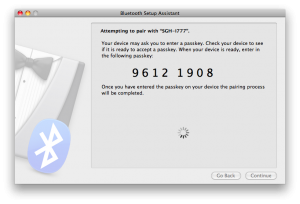
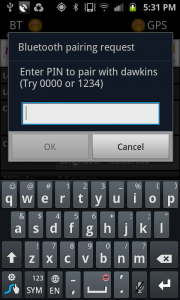
Once that’s up and running, it’s time to pair your computer and phone. Make sure that the GPS to BT program is running at this point!

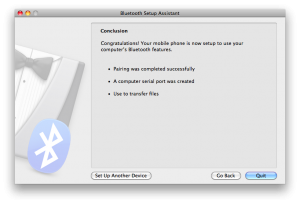
If everything worked properly, you should see the following:Make sure that it says “A computer serial port was created”. If it doesn’t say this, your computer didn’t pick up on the serial data stream from the GPS program, and you should retry pairing.

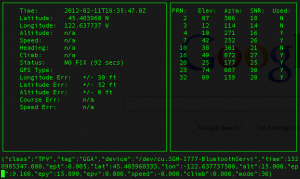
Once OS X has created a serial port, you simply need to point GPSd at it. In a terminal, run

ls /dev/tty.*

One of the results should be /dev/tty.[[devicename]]-BluetoothService — this is what to point GPSd at:

sudo gpsd -n /dev/tty.[[devicename]]-BluetoothService

and you should be up and running!

At the moment there is one caveat: you have to re-pair your devices each time you want to fire up the GPS — at the moment OS X seems unable to open the bluetooth serial port on request. Other than that, it works like a charm!

IndieWeb, or how to avoid Digital Sharecropping

Thanks to the DorkbotPDX blog I found my way onto the website of this year’s IndieWebCamp, which took place in Portland June 25 & 26. Although I was saddened that I wasn’t in town for it, the projects that ended up being developed by the camp immediately grabbed my interest.

Although I had never been aware of the term “indie web” (which seems to have been around for almost 15 years, judging by this article from uzine.net), I’ve been building my own independent web presence for more than four years. In the words of the IndieWebCamp home page:

Rather than posting content on many third-party silos of content, we should all begin owning the content we’re creating. Publish short status updates on your own domain, and syndicate to Twitter. Publish photos on your own domain, syndicate to Flickr, etc, etc.

For some good summaries of the ideas and goals of the IndieWebCamp, this article from GigaOm and this post from Mark Hendrickson are a great place to start, while each of the camp’s guests also have their own websites, each with a wealth of information.

While I’ve been using this domain for quite a while, it’s been in use alongside Facebook, Delicious (and Flickr, to a smaller degree) as a part of my web presence. However, since I ditched Facebook five or six months ago, I’ve been relying on this domain for more, and overall I’ve been pleased. However, as the IndieWebCamp is readily willing to admit, there is room for a lot of room for technical innovation in expanding the functionality of the indie web. Towards that end, I see three threads of work that I’m interested in pursuing:

  • Using my site for Flickr-like photo sharing. While this might include syndication to Flickr at some point, I mostly want a light-weight DIY solution to photo sharing.
  • Similarly, using my site for bookmarking. I really like the service that delicious offers, but I want to own the data and let delicious simply keep a copy of it (see http://adactio.com/journal/4197/ for some ideas).
  • Finally, I’m hugely enamored of the work on delivery-agnostic messaging that took place at IndieWebCamp, which you can find details of here. Not only is it a ridiculously simple protocol, but it starts to address some real issues of a distributed social web, in that it allows two-party communication based solely on domain names as unique identifiers, therefore eliminating the middleman in social-web-type communications.
Hopefully I’ll have time to get one of these ideas worked out and running on my site soon (before school starts), so check back here soon, I’ll be sure to keep you posted.

Map Tiles with Python + GDAL

After getting GPSDrive running on OS X I started looking into different sources for maps. The GPSDrive wiki has a couple of interesting pages about this: one on creating maps and one on map sources. The second page pointed me to the LibreMap Project which has a complete collection of  USGS 1:24000 (large scale) topographic maps for the entire US. These files are distributed as high-resolution GeoTIFF files, along with world files, so the maps are fully geotagged. This means that they contain all of the information needed to generate GPSDrive-friendly map tiles, but GPSDrive will not read them directly. The creating maps page gives some (heavily out-of-date) advice on how to use the gdal_slice.sh script distributed with GPSDrive to create map tiles using the tools from GDAL. Sadly, this script is completely unusable on OS X, because of incompatibilities in the command line tools that are used by the shell script. After spending about five minutes trying to tune it to work with the tools that Apple ships, I completely gave up and looked into other approaches.

Luckily, I quickly found out that GDAL ships with Python bindings. I installed GDAL from source using the instructions from their wiki. To make sure it built with Python modules I ran ./configure –with-python. After that make and sudo make install ran without a hitch.

I then set about re-implementing gdal_slice.sh in Python. Once I got a handle on how to use the Python bindings it was fairly easy to write. You can find the script here.

Using gdal_slice.py is very similar to using gdal_slice.sh:

$ ./gdal_slice.py -h
Usage: gdal_slice.py [options] FILENAME

Options:
  -h, --help            show this help message and exit
  -o OVERLAP, --overlap=OVERLAP
                        percentage tiles will overlap. should be at least 20%
  -a, --add             write map info to map_koord.txt in current working
                        directory
  -m, --map             use *_map folders for output; use if input image is
                        UTM. Default behavior
  -t, --topo            use *_top folders for output; use if input image is
                        not UTM
  -v, --verbose         enable debugging output

The biggest difference is that gdal_slice.py does not perform any format conversion; it will write maps to TIFF files. Although the file size is decidedly larger than that of PNGs, my version of GDAL is unable to create PNGs, and disk space is (fairly) cheap. If I’m motivated I’ll get around to adding a format option, at least to allow conversion to PNG.

Running gdal_slice.py filename.ext will create a folder named filename_map (or _top, if you use the -t flag) that contains a set of 1280×1024 TIFF files, as well as a map_koord_draft.txt file. Moving this folder into GPSDrive’s map directory, and merging filename_[map|top]/map_koord_draft.txt with map_koord.txt will make the new maps available to GPSDrive. Note that filename.ext must be in the current working directory, as the script handles filenames/paths somewhat naivëly.

So far I’ve only tested this with GeoTIFFs from LibreMaps, but it seems to work great, with the caveat that LibreMaps’ files include the borders of map, and my script doesn’t do any cropping, so you see borders if you’re near the edges of quads. This doesn’t bother me terribly much, but you may need to turn mapsets on and off in the Map Control dialog to see the appropriate images.

Update 7-14-11: I’ve modified the script with an additional flag (-a) that will automatically merge the generated map_koords file with map_koord.txt in the current working directory. This means that if you run the script from inside .gpsdrive/maps with the -a flag the generated tiles will be automatically added to GPSDrive’s database. The script avoids creating duplicate entries in map_koord.txt, as well as alphabetizing all entries.

I’ve modified the documentation here, as well as the links, to reference the latest version.

GPSDrive on OS X

After getting GPSd to compile on OS X, I set my sights on GPSDrive, an open source navigation and map viewing program. When I posted about GPS a couple years ago, I installed GPSDrive, using the version from Fink. However, the latest version of GPSDrive on Fink nowadays is 2.08pre12, while the latest stable release is 2.11. I’ve also moved away from using Fink and/or MacPorts for package management in favor of Homebrew.

To get GPSDrive running I had to do a little bit of fiddling, but it’s fairly easy. First off, I needed to downgrade GPSd from 2.96 to 2.95 — apparently the newest version introduced slight changes to the library that GPSDrive hasn’t yet picked up. However, building the two versions is exactly the same — see my post on building 2.96 for instructions that apply to 2.95. You can get the source package for either version here.

Next I used homebrew to install the dependencies that GPSDrive needs by running brew install gtk+ cairo gtkglext postgresql gettext. Note that these are just the packages I didn’t have going into the build — you may need more, depending on your setup.

With preliminaries out of the way, I downloaded gpsdrive-2.11 from here. As per their build instructions I created a build directory (mkdir build), moved into it (cd build), and then ran cmake. After some serious wrestling with dependency locations and linker flags I figured out the following two steps to get GPSDrive to compile and build.

First, because GPSDrive seems to want to automatically link against libcrypt, which OS X bundles in it’s libc, you need to tell cmake not to use it. I couldn’t figure out how to do with with a cmake configuration option, so I edited gpsrive-2.11/src/CMakeLists.txt and commented out (put a # in front) of the two lines containing the word “crypt”. You could also delete these lines — it has the same effect. This is along the lines of the patch here (see the attachment), that was posted to the GPSDrive mailing list last year, when I pointed out this bug. Sadly, the patch has not been applied to the source tree yet, but I can attest it works, if you care to apply it yourself.

With that out of the way, we can now run the following command from inside the build directory.

cmake -DCMAKE_BUILD_TYPE=Debug\
 -DWITH_FRIENDSD=OFF\
 -DWITH_KISMET=OFF\
 -DWITH_MAPNIK=OFF\
 -DWITH_POSTGIS=OFF\
 -DWITH_SPEECH=OFF\
 -DLIBGPS_OLD=OFF\
 -DGTK2_ATK_INCLUDE_PATH=/usr/local/Cellar/atk/2.0.0/include/atk-1.0\
 -DGTK2_GLIBCONFIG_INCLUDE_PATH=/usr/local/lib/glib-2.0/include\
 -DGTK2_GLIB_INCLUDE_PATH=/usr/local/include/glib-2.0\
 -DGTK2_PANGO_INCLUDE_PATH=/usr/local/Cellar/pango/1.28.4/include/pango-1.0\
 -DGTK2_CAIRO_INCLUDE_PATH=/usr/local/Cellar/cairo/1.10.2/include/cairo\
 -DGTK2_GDKCONFIG_INCLUDE_PATH=/usr/local/Cellar/gtk+/2.24.4/lib/gtk-2.0/include\
 -DGTK2_GTK_LIBRARY=/usr/local/lib/libgtk-x11-2.0.0.dylib\
 -DCMAKE_C_FLAGS="-I/usr/local/Cellar/gdk-pixbuf/2.22.1/include/gdk-pixbuf-2.0"\
 -DCMAKE_EXE_LINKER_FLAGS="-lgdk_pixbuf-2.0.0 -lpango-1.0.0 -lgobject-2.0.0 -L/usr/local/Cellar/gettext/0.18.1.1/lib -lintl"\
 -DMSGFMT_EXECUTABLE=/usr/local/Cellar/gettext/0.18.1.1/bin/msgfmt\
 ..

After cmake generates all the necessary files, you can run make, and assuming it doesn’t give you errors, ./src/gpsdrive will allow you to test your newly built executable, and sudo make install will install it.

Once GPSDrive is up and running you should be able to see your current location (assuming you have a GPS connected to GPSd). If you want to get maps, you can download them from within GPSDrive, which has support for OpenStreeMap tiles, as well as NASA Landsat images (although I haven’t been able to get Landsat to download correctly).

Sign your email like Randall Waterhouse

Neal Stephenson’s novel Cryptonomicon is a fascinating book; I’m re-reading it for the umpteenth time and loving it every bit as much as when I first read it in 7th grade. One thing that caught my attention on this reading (especially in light of my recent GPS post) is the way that one of the main characters, Randall Lawrence Waterhouse, signs his email:

Randall Lawrence Waterhouse

Current meatspace coordinates, hot from the GPS receiver card in my laptop:

8 degrees, 52.33 minutes N latitude 117 degrees, 42.75 minutes E longitude

Nearest geographical feature: Palawan, the Philippines

(from http://www.euskalnet.net/larraorma/crypto/slide51.html)

Using GPSd’s python bindings, and the free, CC-licenced RESTful API from GeoNames.org, I wrote a short python script that will produce a similar output:

Seth Just

Current meatspace coordinates, hot from the GPS receiver card in my laptop:

41.751 N latitude, 111.807 W longitude

Nearest geographical feature: Logan Canyon, Utah, United States

The core of the script is two functions — one that gets GPS coordinates from GPSd, and a second that does a lookup for geographical features (mountains, canyons, islands, etc) on GeoNames.org. For more details, see the final section of this post.

Using gpssig.py

To use gpssig.py, first download it from here, and change the extension to .py.

In order to be useful as an email signature, I had to produce output in HTML format, which allows almost any mail client to use the output as a signature. I’ve gone through the effort of setting it up with the two clients I use the most: Mozilla Thunderbird and Apple’s Mail.app. Of these two, Thunderbird has documented support for HTML signatures (see here for details), and should be the most like other email clients. This script has been tested on Mac OS X Snow Leopard, and should run on Linux without problems (although I haven’t tried it on versions of python higher than 2.6.1).

Using gpssig.py takes two steps: first configure your Mail client to take a signature from a file, and then configure gpssig.py to run automatically to update that file.

Thunderbird is relatively easy to set up with an HTML signature. Because it only supports one signature per account, you simply need to tell it to draw that signature from a file. Under each account’s settings there’s an option to “Attach the signature from a file” (see here for a detailed howto). I chose to use ~/.signature.html, but you can use any file you’d like to, just remember the location you choose.

Mail.app is a more finicky beast — although the script supports it, I recommend using Thunderbird, mainly because Mail only refreshes its signatures from files on every launch, whereas Thunderbird will read the file each time you compose a message. However, if that limitation is acceptable (if you don’t move very much, perhaps), it will work just fine. The main issue with Mail.app is that it doesn’t store signatures in an HTML file, but instead in the proprietary .webarchive format. These files can be found in ~/Library/Mail/Signatures. To use gpssig.py with Mail, you need to follow steps 4&5 from http://bytes.com/topic/macosx/insights/825900-setup-html-signatures-apple-mail-mail-app. First create a new signature (under Preferences->Signatures). This will create a new file in the signature folder — take note of the file name. You will use this file name to configure gpssig.py.

gpssig.py is configured with command line options:

Usage: gpssig.py [options] NAME FILENAME
Note: NAME should be enclosed in quotes, unless it contains no spaces.

Options:
  -h, --help   show this help message and exit
  --no-gps     don't attempt to get coordinates from GPS
  -a, --amail  generate files for Apple's Mail.app (.webarchive)
  --lat=LAT    default latitude, if GPS is unavailable
  --lon=LON    default longitude, if GPS is unavailable

The simplest way to use it is manually — simply running it whenever you want to update your signature. For example, I use ./gpssig.py –lat=41.752 –lon=-111.793 ‘Seth Just’ ~/.signature.html to generate a signature for Thunderbird.

If you want to make this automatic, you’ll need to have the script run automatically. On OS X you’ll need to use launchd, while on linux you need cron. Both of these make setting up repeating actions very easy — see here for information on launchd and here for information on cron.

Sadly I haven’t yet figured out a way to run the script whenever you write an email — if I figure it out, I’ll be sure to post something.

The Script

gpssig.py is built around three major functions — one gets coordinates from GPSd, one gets geographical feature information from

The function I use to get GPS information is a bit hacky — there doesn’t seem to be terribly much documentation on GPSd’s python bindings, so I made do with what I could figure out:

class NoGPSError (Exception): pass

def get_lat_lon():
  # GPSd Python bindings
  import gps

  # Create GPS object
  session = gps.gps()

  # Set GPS object as an iterator over reports from GPSd
  session.stream(gps.WATCH_ENABLE|gps.WATCH_NEWSTYLE)

  # Loop until we get a report with lat and lon. The limit of 5 loops should be more than enough -- my gps never takes more than three when it has a lock
  i = 0
  while (1):
    try:
      session.next()
      lat, lon = session.data['lat'], session.data['lon']
      break
    except:
      if (i > 5): raise NoGPSError 
      i += 1

  return lat, lon

The other function is more straightforward — it makes two http requests to GeoNames.org to get the nearest geographical feature and locality. It then combines those responses in a way that should provide a good response almost anywhere in the world (provided that GeoNames has good, local data). I’ve tested it with a variety of coordinates (provided by http://www.getlatlon.com/), and the responses seem to be pretty good.

def get_geo_string(lat, lon):
  # Modules for REST/XML request from GeoNames
  import urllib
  from xml.etree import ElementTree as ET
  
  # Request the name of the nearest geographical feature
  placename = ET.parse(
      urllib.urlopen("http://api.geonames.org/findNearby?lat=" + str(lat) + "&lng=" + str(lon) + "&featureClass=T&username=sethjust")
      )
  subdiv = ET.parse(
      urllib.urlopen("http://api.geonames.org/countrySubdivision?lat=" + str(lat) + "&lng=" + str(lon) + "&username=sethjust")
      )
  
  # Format and return place, region, country
  try:
    country = subdiv.getiterator("countryName")[0].text
  except:
    try:
      country = placename.getiterator("countryName")[0].text
    except:
      country = ''
  try:
    region = subdiv.getiterator("adminName1")[0].text
  except:
    region = ''
  try:
    name = placename.getiterator("name")[0].text
  except:
    name = ''
  
  if country:
    if region:
      if name:
        result = "%s, %s, %s" % (name, region, country)
      else:
        result = "%s, %s" % (region, country)
    else:
      if name:
        result = "%s, %s" % (name, country)
      else:
        result = country
  else:
    result = "unknown"
  
  return result

Finally, the main method of the program parses arguments, determines what coordinates to use, gets the geographical feature string, and then generates the proper HTML and copies it into the correct place.

if (__name__ == "__main__"):
  # Parse command line options
  from optparse import OptionParser
  parser = OptionParser("Usage: %prog [options] NAME FILENAME\nNote: NAME should be enclosed in quotes, unless it contains no spaces.")
  parser.add_option("--no-gps", action="store_true", dest="nogps", default=False, help="don't attempt to get coordinates from GPS")
  parser.add_option("-a", "--amail", action="store_true", dest="amail", default=False, help="generate files for Apple's Mail.app (.webarchive)")
  parser.add_option("--lat", action="store", type="float", dest="lat", help="default latitude, if GPS is unavailable")
  parser.add_option("--lon", action="store", type="float", dest="lon", help="default longitude, if GPS is unavailable")

  options, args = parser.parse_args()
  
  try: assert(len(args) == 2)
  except AssertionError:
    print "You must provide NAME FILENAME\n"
    parser.print_help()
    exit()

  try: assert(((options.lat!=None) & (options.lon!=None)) | ((options.lat==None) & (options.lon==None)))
  except AssertionError:
    print "You must provide both lat and lon arguments\n"
    parser.print_help()
    exit()

  # Modules for creating signature file
  import tempfile, os

  try:
    if (options.nogps): raise NoGPSError
    lat, lon = get_lat_lon()
    print "Got %f, %f from gps" % (lat, lon)
  except NoGPSError:
    if (not options.nogps): print "Failed to get coordinates from GPS"
    try:
      assert((options.lat!=None) & (options.lon!=None))
    except AssertionError:
      print "No default coordinates provided; exiting"
      exit()
    lat, lon = options.lat, options.lon
    print "Using %f, %f as coordinates" % (lat, lon)

  geostring = get_geo_string(lat, lon)

  lac, loc = 'N', 'E'
  if lat \n

") file.write(args[0]) file.write("

\n

") file.write("Current meatspace coordinates, hot from the GPS receiver card in my laptop:") file.write("

\n

") file.write("%.3f %s latitude, %.3f %s longitude" % (lat, lac, lon, loc)) file.write("

\n

") file.write("Nearest geographical feature: " + geostring) file.write("

\n") file.write("\n") file.flush() if (options.amail): os.system("textutil -convert webarchive -output " + args[1] + " " + file.name) else: os.system("cp " + file.name + " " + args[1])
GPSd under OS X (revisited)

It’s been almost 2 and half years since I originally posted about GPSd and OS X. That post got quite a bit of traffic for a while, but a whole lot has changed since then. If you’re interested in some in-depth background information, you should check out the old post; this post is mostly about the changes in the GPSd project since then, and the process of getting it running on OS X.

Two and a half years ago, GPSd had just released version 2.38. The latest version, which I just downloaded, is 2.96. Most significantly, GPSd has updated their communication protocol from a simple character-command format to one based on JSON-packed data. Further, they’ve built a significant portion of the project around python, and consequently built better python interfaces into the project.

OS X has also been updated, from whatever 10.5.x was current three Januaries ago, to 10.6.8. Luckily, the under-the-hood changes that Snow Leopard brought to the table should only make compiling software easier.

Building GPSd is a whole lot easier than it was the last time I went through all of this. I downloaded the latest source package (from http://prdownload.berlios.de/gpsd/gpsd-2.96bis.tar.gz). The bundled INSTALL file lists only python and py-gtk2 as dependencies, which makes compilation easy, given that python comes bundled with OS X. Although py-gtk2 is available through MacPorts (using sudo port install py-gtk2) I chose to avoid install the ridiculously long list of dependencies that it requires, as it is only required for the graphical test client (xgps), and GPSd also ships the perfectly functional command-line tool cgps, which provides the same information, albeit in a more sparse manner.

The actual build process is surprisingly easy: I ran ./configure –x-includes=/usr/X11R6/include, as suggested by the INSTALL file. As this indicated no issues, I ran make and sudo make install, which ran without a hitch, and gave me a working set of gps tools.

At this point it is possible for me to attach my GPS (see my old post for information about getting devices up and running), run gpsd -n /dev/cu.usbserial, and then use cgpsto get coordinates, date, and satellite information. However, this isn’t everything — all of the python based GPSd tools, such as gpsprof, still don’t work. This is because of Apple’s slightly special python distribution — while GPSd’s sudo make install puts python modules into /usr/local/lib/python2.6/site-packages/, they need to be in /Library/Python/2.6/site-packages/. Instead of having to install these manually, you can use the bundled python install script to put the modules in the correct path by running sudo python setup.py install (thanks to http://docs.python.org/install/index.html).

Now that I have the most recent GPSd up and running I’m hoping to do some fun things with it. If I do, you’ll see it here!

Web Laundry, Smart Cards, Python and OS X Smorgasbord

Disclaimer: This article is for informational purposes, the author shall not be held liable for any actions taken on the basis of the information presented. I do not condone fraud, theft, or other malfeasance.

In September 2010, posted an article about the insecurity of the stored-value smart card system used by Web Laundry (now Wash Laundry). I’ll let that article stand on its own — it gives a good overview of the bone-headed system that the engineers there had in place. In short, they used a secure memory card made by Atmel (specifically, from the CryptoMemory line), the AT88SC0404C (datasheet here), but neglected to change the default master password. This means that all you need to read or write the stored data is a ISO-7816-3 compliant smart card reader.

This is where my story starts — this summer I’m living in a dorm that uses a Web Laundry stored value system. That was enough of a push for me to buy a smart card reader, seeing as I’d always wanted to play with them, and this looked like a good opportunity. I picked up a smart card reader from Amazon.com, an SCM Microsystems SCR3310. It was both cheap and, according to the manufacturer’s product page, offers full ISO 7816, CCID and PC/SC compatibility (i.e. all of the relevant standards), as well as drivers for OS X, which is my primary operating system for the time being.

Doing some research, it turns out that Apple ships a (modified) version of the open-source PCSC Lite framework for smart card integration. This means that all I would need to get up and running was a driver for my device and a way to interface it. Once the reader arrived I installed the drivers, and ran pcsctest (from PCSC Lite) on the command line. Sadly, all I got was an error message:

Testing SCardEstablishContext    : Service not available.

Googling told me that the appropriate services are supposed to start whenever a smart card reader with appropriate drivers is plugged in, which made this error all the more confusing. Luckily, I found this thread on SCM’s forums — it seems that the driver they have posted doesn’t include the USB identifiers for the version of the reader I had, but a helpful poster left instructions to modify a plist file in the driver (mirrored here for archival purposes). With that, I was up and running!

pcsctest spat out useful output this time around:

$ pcsctest

MUSCLE PC/SC Lite Test Program

Testing SCardEstablishContext    : Command successful.
Testing SCardGetStatusChange
Please insert a working reader   : Command successful.
Testing SCardListReaders         : Command successful.
Reader 01: SCM SCR 3310 00 00
Enter the reader number          : 1
Waiting for card insertion
                                 : Command successful.
Testing SCardConnect             : Command successful.
Testing SCardStatus              : Command successful.
Current Reader Name              : SCM SCR 3310 00 00
Current Reader State             : 0x34
Current Reader Protocol          : 0x0
Current Reader ATR Size          : 8 (0x8)
Current Reader ATR Value         : 3B B2 11 00 10 80 00 04
Testing SCardDisconnect          : Command successful.
Testing SCardReleaseContext      : Command successful.

That left me with the issue of interacting with the smart card somehow. In case you hadn’t guessed from the post title, that solution was Python. Specifically, the pyscard bindings for PCSC Lite, from pyscard.sourceforge.net. There’s a nice array of examples, and so I wrote up a python script for interacting with this particular CryptoMemory card, based on the command set from the datasheet and the examples. It’s not as polished or feature-rich as the software Hans posted, but if you’re running OS X or Linux, it should be helpful. At the moment this script is extremely rough — it gets the job done, but in an ugly and unsafe way. I’m posting it here, but you SHOULD NOT USE IT IF YOU DON’T KNOW WHAT YOU’RE DOING. If you aren’t careful, it will mess up your card. Hopefully I’ll have time to wrap it all in a library that will abstract away the messiness and provide nice features like exception handling; if I do, you’ll see it here.

Using my script I was able to verify Hans’ findings — although the card is configured to require cryptographic authentication to access the user zones (where the goodies can be found), the password is left at the default value, which makes overwriting the access registers and conducting a replay attack (as demonstrated by the video in his post) a walk in the park. Following his example, I won’t post any information on how the cards store their values, but it’s surprising that this security hole still isn’t fixed, seeing as it would cost nothing to overwrite the master password when they first configure the cards.

Hopefully this post will give some of you who’ve wanted to work with smart cards a push in that direction — although there are a few hurdles along the way, it’s an interesting area to work on. I’m hoping to move on from poking at other people’s cards and start using my new hardware for authentication and encryption.

Happy hacking!